1. Download the archive and locate the files
Press Download button and wait for the download to complete. Might take awhile!
Double click on the downloaded DMG file and you should see folder with iconographics.
This will look overwhelming at first. Nothing to worry, we just overdocumented it. 🙂
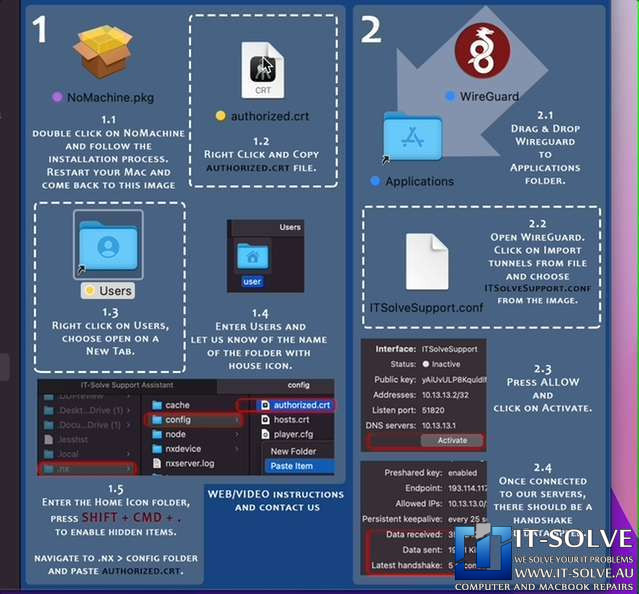
1.2-1.4. Install NoMachine Public Key
Open downloaded IT-Solve Support Assistant disk image.
Copy authorized.crt file
Open Users folder in a new Tab and click on Users folder inside.
There will be couple folders in there. Locate the folder with Home icon on it (this is usually with your username) and note down the exact spelling of the username. You will have to pass this to us.
Enter the folder with the username and hold the Left Shift and Command keys press . key (this is the fullstop key).
This will unhide bunch of folders.
Navigate to .nx / config folder and paste the authorized.crt file

1.5 Allow NoMachine in Privacy Settings
Find System Settings > Privacy and Security > Screen & System Audio Recording and Tick the Box for NoMachine.
This might ask NoMachine to quit and reopen. Do so.
Press back arrow and locate Full Disk Access and tick NoMachine.

1.6 Open Router ports
Lookup NoMachine in the Applications folder and start it.
On the Main Window of NoMachine, click on Settings > Server > Status and ensure Server is running
Click on Ports and ensure NX Service is selected. Then press Configure for more options.
Tick TCP and wait for it to be acknowledged. If no errors and tick stays solid, do the same for UDP too.
This will send a uPNP request to your router to open a port and allow remote desktop connection.
If the ports unticks themselves or there is no GW TCP/IP numbers displayed on the previous port tab, then jump to Step 2 WireGuard Setup to create a VPN manually.
2. Open Router ports
Open mounted IT-Solve Support Assistant Image file.
2.1. Drag and Drop WireGuard to the Applications folder
2.2. Open WireGuard and click Import tunnels from file and choose ITSolveSupport.conf from the mounted IT-Solve Support Assistant Image.
2.3. Press Allow to add the VPN settings into MacOS.
Click Connect from the WireGuard window to connect to IT-Solve Remote Support Server.
2.4. Ensure that a handshake is recent as well as there is send and received data.